
For roughly a year now, I’ve been a full time adopter of Linux, using ubuntu on several computers. For the most part, the transition has been seamless, but there were a few specific tasks that needed a bit of effort to get working. Today, I was faced with the challenge of doing video editing.
Just to set the stage, I had a few MP4 video files on my Samsung Galaxy S8. They were split a bit awkwardly into 33 minute video files. Most of the content could be trimmed away, but some of the interesting parts were split into the end of one file and beginning of another. So my task was to just do some simple cutting and splicing before the file was ready to be uploaded to YouTube.
I did a quick search to see what people normally use for video editing on linux, and one of the apps mentioned was DaVinci Resolve. Having used and been satisfied with DaVinci Resolve in the past, that’s where I started.
Installing DaVinci Resolve on Ubuntu
When I was doing the research, some Reddit threads I stumbled upon warned about the difficulty of getting the software installed. This turned out to be warranted. The official download page lets you download a script for linux, not mentioning any specific distro or architecture. Running the script, in my case, gave me an error mentioning some missing dependencies.
Error: Missing or outdated system packages detected.

Please install the following missing packages:
    libapr1 libaprutil1 libasound2 libglib2.0-0

Use SKIP_PACKAGE_CHECK=1 to bypass the system package check.
Installing those dependencies did not quite work without modification. A handful of the dependecies had a slightly different name, and installing those differently named dependencies did not help with the DaVinci Resolve installation script. Not wanting to dig into the script or potentially break the installation by skipping dependencies, I go back to google. Some people mention that DaVinci Resolve is only officially supported on Rocky Linux, but there’s a tool that solves the problem of the installer.
I download MakeResolveDeb, follow the instructions and generate a working installer. I successfully install DaVinci Resolve.
Converting Video Files to a Compatible Format
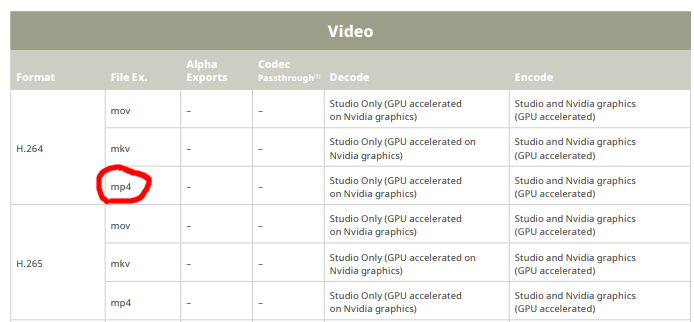
Now that I had all the video files and the editing software, I try to import the MP4 files. I just get a black screen in the preview window. I do some more research and find a video tutorial showing how to convert MP4 files into a compatible endcoding using VLC. This gave me a file that once imported to DaVinci Resolve just gave me an audio track. I do some more googling and find a compatibility table for DaVinci Resolve and DaVinci Resolve Studio. The decoding of my files were not supported in the free version of DaVinci Resolve.
Having used ffmpeg to splice video files together in the past, I figured I could probably use the same CLI to convert the video files. Luckily, the exact command to convert from one encoding to another was easy to find, so I just tried a few versions until I got an output that was able to be imported into DaVinci Resolve. Long story short, the command that worked in the end was
ffmpeg -i input.mp4 -c:v dnxhd -profile:v dnxhr_hqx -vf "format=yuv422p10le" -c:a pcm_s16le output.mov
The file size went from ~4GB to ~38GB, but it worked, and it was free (and I’m not paying for storage) - so this marks the end of my video conversion/editing journey.